Showing posts with label paint. Show all posts

Friday, April 27, 2012

Stripes


Here is our hallway.

What it looked like when we moved in:


 After wallpaper removal


Carpet removed and wall painted Sherwin Williams Moderate White

So last night, while I had about a zillon things on my to-do list, I decided I wanted to take on a fun project and add some spice to our hallway. I stumbled across the picture below on Pinterest.

Pinned Image
(photo from abode love)

As a new home-owner, I don't think I'm ready to do go quite as bold and paint my whole hallway in stripes but I thought that the wall between the master & guest bed room might be a fun accent wall. While Stevens was at a baseball game, I got out some tools, sushi, glass of wine and got to work!

The tools I used were a tape measure, a yard stick, Frog tape, razorblade, a level, and a pen.


I measured the wall to see how thick I should make the stripes.  The above inspiration photo has 5 inch stripes.  The wall measured out to 90 inches from top to bottom so I went with 5 inch stripes.


Taping out these stripes takes a lot of patience, talking to yourself, and having to stop and think about which stripe you are on. The tape goes over the stripe that you are leaving the wall color.
And then the stripe you paint has to be the full 5 inches. 

Because the space I was painting was so small, I would measure out each side then tape and double check with a level.  I also marked each stripe that was I leaving the wall color with a scrap piece of tape - makes it so easy identify which stripes you are painting.  

Finished product! Not sure if this will be permanent or not, took me about an hour and a half to do and the future hubby hasn't seen it yet.  We will see what he thinks!!

Frog tape is amazing!! But will leak if you use oil base paint.  For latex just firmly press around the tape before you paint and remove before the paint dries.  There was very minimal touch-up and the lines are very clean!

Thank you for reading!

Tuesday, April 17, 2012

Painting Brick

 We decided to take a huge leap of faith and paint the wood paneling in our den to give the room an updated and more modern look - it was one of those decisions we had to be sure about because there was no going back.  If you look back at the paint post , you can see where we choose Sherwin Williams Paint Strip 21 and used the top 3 colors.

For the den, we used the third color down - Sherwin Williams Macadamia. Painting the den was one story but for now we will talk about the fireplace. 

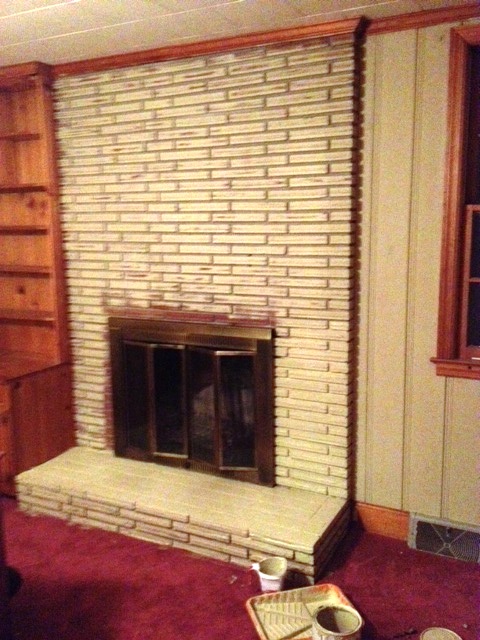
We took off the antique wooden mantel and it revealed some pretty ugly brick. (Side Note - This mantel came from an antique dealer and we are looking to sell it if anyone is interested!!) The bricks were long, skinny, and flat and for some reason they were stacked on their sides the edges poking out to make texture.  We decided to paint the fireplace the same colors of the wall so it would blend in and not stand out so much. 

So here are your steps for painting bricks:
- Clean (by hand or with vacumm)
- Prime with a 2 in 1 primer
- Paint
- Enjoy your new fireplace!


This was much easier than we thought and very much a room-changer! To prep the bricks I did some blog research and hunted on google;  most people said to wash the bricks with thick sponge or cloth to remove any dirt, dust, soot, or cobwebs. We started to wash them but it was really hard to get into all the creases with a sponge and it hurt your fingers to do it with a rag. So we pulled out the shop-vac and vacuumed!

We asked the kind folks at Home Depot what we should use to paint bricks and they recommended Zinsser Cover Stain Oil Base.  This is a tintable primer so we had them tint it to the Macadamia color so we wouldn't have to do so many coats. (Even though it was oil based because brick is porous you can use an oil based primer & paint latex on top. )
After primer:
ONE coat of paint:
The only tedious step was taking a brush and painting all of the mortar between the bricks. No where online mentioned this step but it was must! We also had to use a small artist paintbrush to fill in the spaces that were right next to the bookcase.  And that's it - just 3 simple steps - clean, prime & paint!

Now all we have to do is find a mantel; here are some inspiration ideas!!

Thanks for reading!